Design Spotlight: KOBOLT
Picking up the thread, as it were, after a long hiatus and diving back in with what I hope will become a series of design spotlight posts. As I mentioned in my previous post, so much about the designer’s decision-making process is never shared with the knitter. Obviously, the pattern needs to stand alone and if the directions are followed it should yield the correct result, but one of the things I like about knitters, is that we are questioners, always wondering why something is done a certain way, and just a moment later wondering if it could be done better! There’s no shame in it, rather it should be a point of pride, a testament to our desire to be inventive and self-sufficient. All this questioning is what got me designing in the first place. In fact I remember it with perfect clarity; I was knitting the Laurel hat by Jared Flood and I thought, “there’s got to be a better way to make a bobble…” That was the beginning of what I like to think of as The Greatest Bobble Experiment Swatch of All Time, undertaken by me and my equally curious/daft mother. I think we achieved upwards of 20 bobble variations. Were most of them awful? Yes. But they were bobbles and we’d tried them all and by the end we KNEW which ones we liked. Sometimes you just have to know for yourself. This was also a clarifying moment because, ahem, if you find yourself rethinking a Jared Flood pattern (the gold standard for thoughtfulness), you really know you’ve gone off the deep end. But that’s just the way we knitters are; we continually think of something different/better/more suited to us that we HAVE to do. So we do it. Sometimes the result is wonderful, sometimes less so, but we keep on trying, indefatigably, to make things our own.
So now that I'm on the design side of things, I can't very well expect knitters to blindly follow instructions when I certainly never did. Much better to give you the explanation and the tools and let you decide for yourself. This won't be possible for every design I make but I'm hoping that a little insight into the decision-making process will help you in your own decision making. You can trust that every decision in the design process was something that I considered and very often tested before choosing and that the pattern is written to obtain the same results as I did in the sample. But it doesn't necessarily follow that you will want to do everything the exact same way. You are always free to alter a pattern, as you might alter a recipe, so long as you accept that the results you get may be different. The purpose of explaining the design process will hopefully illuminate the reasoning behind certain choices and clarify whether you might want to change something or not. After all, as the great Elizabeth Zimmerman would say, you are the boss of your knitting.
The Seed of a Design
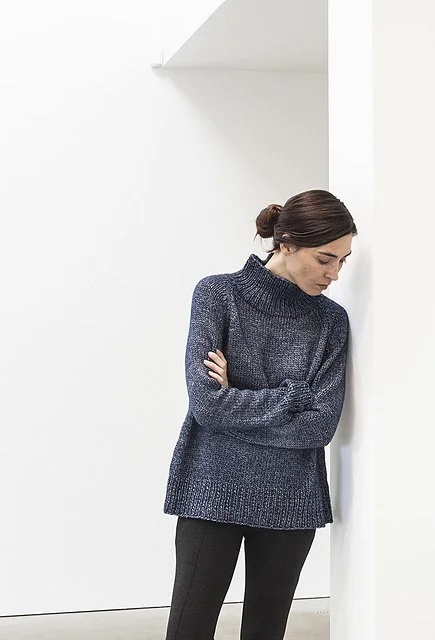
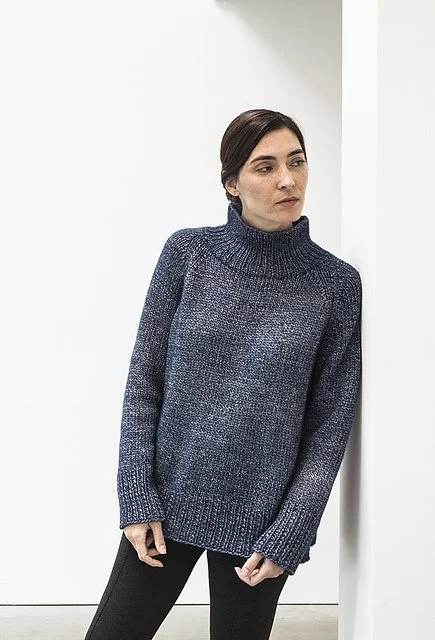
So now to KOBOLT. A lot of my sweaters start as a design challenge to myself. This one was an exercise in simplicity and ease. As Bristol Ivy said so beautifully, "the best sweater is the one that looks like a million bucks and feels like a sweatshirt." I wanted this sweater to be all about ease; ease of execution, ease of wear, and the right amount of positive ease in the garment itself to give it a luxurious silhouette. To me, what makes a garment look luxurious is the combination of beautiful yarn with a silhouette that stands away from the body with just the right amount of ease and makes the wearer look relaxed, almost nonchalant. Comfort and fit are key in looking at ease; if a sweater doesn't fit well, it doesn't matter how nice the yarn is or how beautifully you knit it; you won't look comfortable in it. So I want to make a silhouette and construction that will flatter a lot of body types.And of course, every design truly starts with the yarn and what stitches show it to best advantage. The yarn itself has a complex appearance; it's a white cotton sheath with colored merino fiber blown through it and it has a shimmery, watercolor appearance. So to my mind, the stitch patterns needed to be simple in order to show the yarn at its best. The yarn is large gauge but light and I wanted to emphasize the lightness as it's often one of the hardest things to achieve in hand knits, which tend to be heavier than their ready-to-wear counterparts. So I want simple stitches that look good at large gauge. Now the design goals have been outlined–– I want a relaxed but tailored look, in a flattering shape, using simple stitches.
The Silhouette
So now that the goals of the sweater have been established it's time to look at how I chose to execute them. I chose a length that hits at the low hip, somewhere between the length for a sweater and the length for a tunic, again, in an attempt to flatter a lot of body types. The sweater has a slight A-Line shape since most people get a little wider in the hips and in order for the sweater to skim gracefully over the lower half of the body we need a bit more fabric there, but just enough to make the line of the sweater look natural, not exaggerated.
Keeping in mind the idea of a relaxed yet tailored fit I chose a raglan sleeve–– I love the neckline you can achieve with this construction and the opportunity it gives for decreasing details in the yoke. What makes this sweater special is that it is a compound raglan. When I first started designing it was very rare to find this construction among hand knitting patterns, but of course it was extremely common in ready-to-wear. A compound raglan has a shorter raglan depth in the front body and a longer one in the back and each side of the sleeve cap is knit to match these different angles. This involves having two different shaping sequences for the front and back body and for the sleeve caps and the effect is that it raises the back and drops the front (the way we usually want to in a sweater) AND it can also allow for a wider neckline and a variety of shaping options in that area. This can be tricky to achieve in a more complicated pattern but I thought a very simple sweater would be a good way to showcase the beautiful fit you can achieve.
Once you decide on a silhouette, there comes the alchemy of deciding exactly how much ease you want in various parts of the sweater and the somewhat mystical process of sculpting the neckline. I have to admit, much of this part of the process is built on experience. I make an effort to try out slightly different things in each pattern, building on what was successful about the sweaters that came before, and that's usually how I arrive at a particular fit. This often means that my measurements don't fall into happy numbers that make for easy sizing and is probably the reason you see certain constructions less often. Almost any fit is achievable in knitting, but whether it lends itself to sizing is a whole other matter. When designing for multiple sizes you have to keep that in mind every step of the way and make compromises accordingly.
The Question of Ease
So what is the right amount of ease? This is so personal and honestly, I don't think any designer can make every design to flatter every size. In addition, every designer has their own ideas about fit that make their patterns distinctive and you might find yourself gravitating to one person's patterns because they always fit you well; but that simply won't be true for everyone. The advantage of a simple but carefully planned silhouette like this one is that it will flatter a great many people; but still, nothing is universal. A little digression about fit and sizing. My personal fit aesthetic tends towards wider necklines and cuffs, sleeves that are not necessarily increased evenly but increase so as to make a smooth line from underarm to cuff, raised back necks whenever possible, dense ribs that are often wider than the main stitch pattern and shaping within collars if necessary. There's a lot more but these are some of the things I had to struggle with when trying to get sweaters to fit the way I liked and I've incorporated them into my designs. When I started designing, a big hesitation was that I wouldn't be able to fit everyone perfectly; in fact, it was actually paralyzing for a while. But I've realized (with the help and encouragement of other designers) that no one person can do it all and if I wanted to share my designs with other knitters I would have to accept that sizing has its limitations. This is where being able to interact with other knitters as a teacher has been so rewarding. As a designer, I can share my aesthetic, writing the pattern for a standard range of sizes, and hopefully connect with knitters who share that aesthetic; in some patterns, like this one, flattering a lot of body types was the goal and I think it's proven quite successful, whereas in other designs the patterning of the sweater can be at odds with a large size range. Luckily, as a teacher I can talk to knitters about how to actually adjust patterns when the standard sizing doesn't work for you. It's sometimes complicated and it takes time and quite a lot of knitting, but if that's your focus as a knitter, it is achievable. However, sometimes you just want to knit something! And you want it to look good when it's done without bashing too many brain cells in the process. So that was the goal of this sweater; ease of execution, ease of wear.
Construction Overview
The sweater is knit flat in pieces, from the bottom up, and seamed together beginning with the raglan pieces and followed by the underarms and side seams. The collar is picked up and knit from the neckline stitches. A piece at this gauge can easily look sloppy if care is not taken so the use of seams, particularly in a soft, malleable yarn like Luft, is another critical element that contributes to the elegant silhouette. The fabric is knit loosely enough to drape but the seams provide some necessary structure to keep the piece looking trim.
In Praise of Pieces
This is really part of construction but I find this concept so important I thought it deserved its own heading. I've been kicking around an idea for a class of this title so it may one day be a reality but for now I'll just give a brief list of reasons of why I like piecing in knitted garments. I invoked the name of Elizabeth Zimmerman earlier; EZ was a consummate master of seamless shaping in knitting and I can't help but imagine her gasping at this section title. I love her work, revere her ideas and stand in awe of her; but she said I was the boss of my own knitting and that's the biggest part of her teaching that I took to heart. Like all things in hand work it is very personal and since you're the one going to do the work, you should probably enjoy the process; in this case my preference for pieces worked flat and seamed is partly based on my experience of how the knitted garments will wear over time, partly on how I like them to be finished and partly on how I personally like to produce knitted fabric. When working with 100% wool I feel that all sorts of garment construction possibilities are open to you since the fabric is so stable (and I think it's important to note that wool was all EZ ever worked her amazing three-dimensional knits in––very wise!). However, since I frequently work with fibers other than wool, I find that my best chance of creating a structurally-sound garment that will hold its shape over time is to employ pieces and seams. I've tested this theory on fibers like cashmere silk, 100% alpaca, 100% yak and others and consider the longevity of the garments I made to be a testament to the method I employed.When it comes to finishing I often feel like this is truly where the magic happens in knitting. Philosophically, I love the idea that we need no seams in knitting and that everything can be made in one incredible, organic piece. It's marvelous and inspiring but most of the time for me, it's something that other people do:-) When it comes to making knitted things myself I enjoy taming the fabric at the end of the process with seams and edgings. Actually, truth be told, I don't even think about it as enjoyment, I think of it as some sort of imperative. I like imposing controlling edges and seams on my sweaters. I like making garments that can stand up to the hard wear that I will give them and I make things with the intention of wearing them for a very long time, so longevity really matters to me. This doesn't have to be as important to you but it is an underlying principle for my designs and it's nearly impossible for me not to consider that when I make something. So you've been warned:-)The last chorus in praise of pieces is more personal still––I have an old injury in one forearm and it makes knitting entire sweaters in the round a very taxing process. Supporting the weight of the sweater and churning it around an enormous circular needle can feel like actual work to me, compared to the ease and comfort of knitting flat, so I reserve it for special design reasons like yoke sweaters. In addition, I lead a rather itinerant existence, much of it spent on the subway on the way to classes or lessons, and I like being able to carry a manageable portion of a sweater in my bag and being able to happily work on it on the train without taking up to too much room or having too much weight to carry around all day.
Design Details
Since the sweater is comprised of the most basic elements of knitted fabric, stockinette stitch and ribbing, the details in this design are rather few but that's all the more reason to make them count. Since the raglan area and neckline are the focal points of the sweater I chose full-fashioned decreases to emphasize the line from underarm to collar. These decreases are placed several stitches inside from the selvedge and lean towards the seam they flank; in general, these decreases are more conspicuous than decreases that lean in the same direction as the angle they follow. On plain sweaters this is my default decrease as it really brings so much to the appearance of the fabric with so little effort. The only decision for me really is exactly which type of enhanced decrease to use to best suit the yarn in question. Part of this is first determined by the gauge of the fabric; a smaller gauge sweater might allow you to do double or even triple decreases to achieve the desire shaping, whereas a sweater of this gauge only requires single decreases. The exact decrease used involves a slipped stitch that ultimately lies across the fabric like a cross hatching and is very pretty when used in a series. In fact, getting to use decreases in a decorative fashion is another reason I'm such a fan of knitting from the bottom up. I almost always prefer the appearance of decreases to that of increases. A word about the selvedge stitches. Although invisible in the finished sweater, selvedge stitches contribute to the stability of the edges on each piece and can affect the ease of the blocking and seaming processes. Because of the large gauge of this yarn I opted for a slip stitch selvedge that would reduce bulk in the seams.

Choosing a Size
The pattern lists the sizes as follows:
SIZES
1 (2, 3, 4, 5, 6, 7, 8, 9, 10, 11)
FINISHED MEASUREMENTS
38.75 (41.25, 43.5, 45.75, 48, 51.5, 54.75, 58.25, 62.75, 66.25, 69.75)" bust circumference
Shown in size 3 with +10"
Choose 4―6" ease for a relaxed fit or 6―10" of ease for a more oversized fit.
This means that the finished dimensions of the sweater are intended to be 4―6" larger than your full bust measurement for a relaxed fit or 6―10" bigger for am oversized fit.
To find the right size, take your full bust measurement and add these increments to it.
Example: 36” bust + 4”–6” of positive ease = 40”–42”
So if I chose the size 2 which is 41.25” this would get me a relaxed fit.
Example: 36” bust + 6”–10” of positive ease = 42”–46”
This means I could choose either size 3 or size 4 for an oversized fit. If you have no idea how much ease you want it helps to measure a sweater you already wear and like, just take into account that a thicker yarn like this requires more ease than a thinner yarn because the yarn itself takes up space around the body.
But once again, the choice of size is still personal. For example, I am a 36" and personally I find that the second size (43.5" at the bust) is plenty roomy for me. I have large shoulders and for me I think there might be such a thing as too much ease, so for an oversized garment I generally like to stick to the range of 6–8" of positive ease, unless the garment is in a very light yarn. That being said, the next size up would be perfectly wearable for me and I might choose to make that size at some point. I've knit enough sweaters by now to know that for most occasions I will prefer the 43.5" but it really is difficult to know with a certainty how the larger size will look on me without actually trying it. This is the part of the equation that you do have to discover for yourself and that can honestly take making a few sweaters. This murky area of "what size to make" used to drive me completely crazy when I was a new knitter, so if you're fuming in your chair right please believe that I sympathize most sincerely. I can only repeat what more experienced knitters told me at the time; you really have to make a few sweaters to learn what it is that you like and feel comfortable in, so consider it a necessary part of the learning process. Everything about knitting is slow, my friends; you just have to accept that it's a long game and that things will become clearer over time with more experience. In the meantime, a pattern like this is aimed at getting you a reasonably good fit with minimal effort on your part. The oversized silhouette eliminates a lot of the need to worry about the exact amount of ease and at the very least, you should end up with a cozy sweater that will hopefully become a wardrobe staple. I've certainly gotten a lot of use out of my own personal KOBOLT and it's now difficult to imagine a chilly winter weekend without it.
One more word about those of you who share my obsession with fit. I've said that learning about what size suits you is a process that can take some time but there are ways to speed up that process. What worked for me when I was learning about fit was to make a sweater, assess what I did and did not like about that sweater, and then make it again with a small number of adjustments. It's simply amazing how much better something can get the second time around and usually for me that's all it took to refine the fit to my satisfaction. You don't even literally have to make the second version in the same yarn or the exact same stitch pattern (though don't go too wild with too many changes at first), just be judicious in your choice of change. Of course, if you knit the same exact sweater in the same exact yarn that will give the best possible chance of success as you will already know all of the relevant data for that yarn and that pattern. Think about trying to master a pie crust recipe––it makes sense to repeat the same recipe several times exactly as written in order to get the hang of it. But sweaters take longer to make than pastry and most of us seldom feel like we want to knit the same exact sweater twice. That decision is entirely up to you, but the comparison to pastry making is still true. Repetition is vital in the learning process. For myself, repetition combined with making small changes satisfied my need to try new things while still be fairly well-assured that the finished product would be something I liked.
My last word on this is: keep notes. I have a Pie Diary and countless knitting notebooks and they serve the same purpose; to record exactly what I did and to assess the results. It can sometimes be a habit you have to form but you will never be sorry you took notes.
I hope this little window into my process has been helpful. I started knitting with the single-minded purpose of knitting sweaters that I love to wear and I want to make that same incomparable pleasure accessible for as many people as I can. I think it can be interesting and instructive to see how other people go about things but in the end, this is about using your own two hands to make something that please only you, so take what you can from this, then go forth and find your own way!
Ok, enough chatter. Time to knit.